|
|
|
|---|
|
The settings window can be used to change and test the many options NostalgicPlayer provides. Some settings takes effect immediately, specially the mixer settings. Others need to be applied or saved first. If you press cancel, only non-saved options with be reverted back as they were when you entered the settings window.
Click on the controls in below picture to get more information.

Options

General
| Jump to added module |
Automatically start playing an newly added module. |
| Add to list as default |
Set playlist clearing off / on when a module is added by double-clicking the file. |
| Remember list on exit |
Save a playlist when NostalgicPlayer quits and load it when NostalgicPlayer starts again. |
| Remember playing module |
Save playing module info when NostalgicPlayer quits and start playing it when NostalgicPlayer starts again. |
| Remember module position |
Save playing module position info when NostalgicPlayer quits and start playing the module at the same position when NostalgicPlayer starts again. |
| Show item number in list |
Shows item number before filename in playlist. |
| Show full path in list |
When enabled, a tooltip is shown with the full path to the module on the item the mouse hover on. |
| Button tooltips |
NostalgicPlayer shows small hints regarding the button under the mouse-pointer, whenever the mouse rests for more than 1 second. |
| Show module name in titlebar |
Show the name of the playing module in the main window titlebar. |
| Separate each window in task switcher |
If checked, you will see each opened window in the task switcher and can switch between them. If not checked, you will only see the main window. When selecting the main window, all windows will pop to front. |
| Show all windows in task bar |
If checked, you will see each opened window collected in the NostalgicPlayer icon in the task bar. |
| Use database to store module information |
Use a local database to store information about the modules, e.g. the playing time or favorite song system information. This database is then used first to retrieve the information and if not available, NostalgicPlayer will calculate the information. |
| Scan added files |
When adding new files to the module list, NostalgicPlayer will look at the file extensions to see if it is a list or archive file, so it can read the entries inside the archive. Sometimes, the extension is wrong or does not exists and therefore NostalgicPlayer cannot detect if the file is an archive. If you then enable this option, NostalgicPlayer will make a deeper check on all the added files. This may take longer time, special when you add a lot of files, e.g. the whole modland directory. Therefore this will run in the background and update the module list when necessary. |
| Remove unknown modules |
If this option is enabled, the background scanner will try to detect each new file added. If NostalgicPlayer cannot figure out which module format the files are, they will be removed from the module list. |
| Extract playing time |
Enable this option if you want to update the module list with the playing time of all known module formats. NostalgicPlayer will first try to read the information from the database, if Use database to store module information is enabled. If NostalgicPlayer cannot read the information from the database, it will try to load the module and calculate the playing time instead. |
Modules
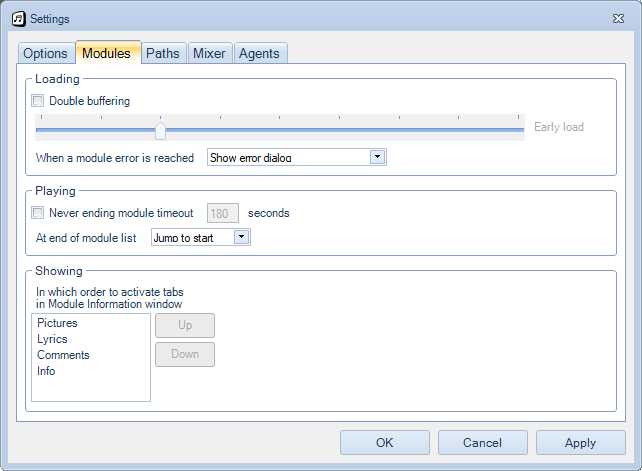
Loading
| Double buffering |
NostalgicPlayer loads next module in the list while the actual module is playing. Early load tells NostalgicPlayer how far (positions) from the ending of the current module NostalgicPlayer will start loading the next one. Enabling this feature will make the small pause between module switch very short. It can be used if you e.g. play a MP3 album where each song is merged into each other. |
| When a module error is reached |
Tells what NostalgicPlayer should do when module loading fails. Possible choices are:
| Show error dialog |
Asks user what to do. |
| Skip file |
Skips file and starts playing next one in playlist. |
| Skip file and remove from list |
Removes file from playlist and starts playing next one in playlist. |
| Stop playing |
Stops playing. |
|
Playing
| Never ending module timeout |
Sets playing time (in seconds) for module if its playing time cannot be calculated. After selected time, NostalgicPlayer skips to next module in playlist. This option can be used with e.g. SID files.
|
| At end of module |
Tells what NostalgicPlayer should do when it has played a sub-song in the current module. Possible choices are:
| Next module in list |
Will load and start playing the next module in the module list. If it is the last module in the list, then the "At end of module list" option is in control. |
| Next sub-song, then next module |
Will start playing the next sub-song in the current module. If the last sub-song is being played, then the next module in the module list will be loaded. |
|
| At end of module list |
Tells what NostalgicPlayer should do when it has played last module in playlist or when you press the next module button. Possible choices are:
| Eject module |
Eject module and stops playing. |
| Jump to start |
Starts playing first module in playlist. |
| Loop module |
Plays last module forever. |
|
Showing
| Module Information window activation tab order |
When a module is playing, different information are shown in the Module Information window. These information can be spread over several tabs. With this option, you can select which tab to autoselect. The search starts from the beginning and stops when reached the first tab visible.
Note that the Info tab is always visible, so all tabs below this one in the list, will never be autoselected. This can be used if you e.g. always want the info tab to be the active one, then place it first in the list. |
Paths
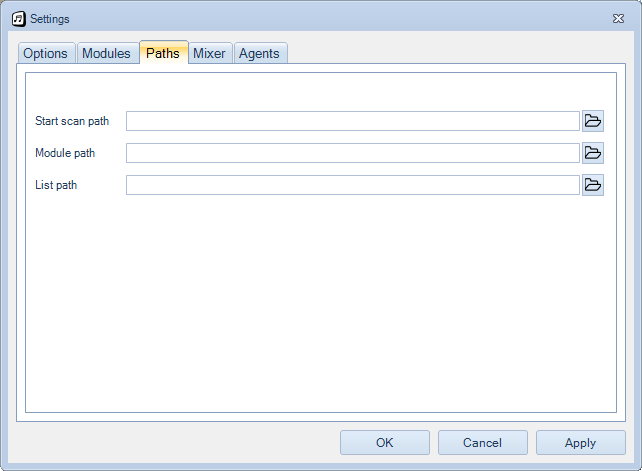
| Start scan |
Defines a directory which NostalgicPlayer will recursively scan through and add all present files to the playlist when NostalgicPlayer is started. |
| Module |
Default path for the file browser to use when you press the play button, the plus button or open command in menus. |
| List |
Tells NostalgicPlayer where you keep your playlist files. |
| Module library |
Where to store downloaded modules from Module Library. If empty, ProgramData folder will be used. |
Mixer
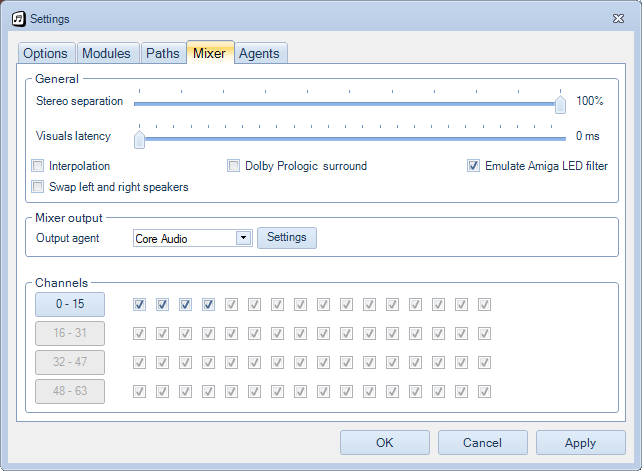
General
| Stereo separation |
100% is total stereo separation ie. left is left and rigth is right. 0% is mono, which forces NostalgicPlayer to play all sounds in both channels. This can be useful for listening to modules in headphones, where a stereo-separation of 50% will make them sound much better. |
| Visuals latency |
If you're using e.g. Bluetooth speakers/headphones, you may have noticed that the visuals are out of sync. This is because NostalgicPlayer updates the visuals at the same time they are played. But when using Bluetooth speakers, the sound need to be transported over the air before you can hear it, and that takes some time. So to synchronize the visuals to what your actually hear, you can delay the update of the visuals by this setting. |
| Interpolation mode |
Helps the sound to be less "rough" and make lesser clicks'n'pops. This pretty much resembles the effect of the filter on the Amiga. Interpolation consumes a little bit more cpu-power than usual. You can select Always, which always enable interpolation. It is also possible to select Samples Only, which will only enable interpolation when playing samples or streaming. If you playing a module, interpolation is disabled. |
| Swap left and right speakers |
Some headphones swaps the left and right speakers. You can then enable this option to swap them back to normal again. |
| Surround mode |
Only supported by a few trackers, e.g. ImpulseTracker and ScreamTracker 3 and is rarely used. If you want NostalgicPlayer to reckon this and make a difference between the front and rear speakers, enable this function. You can select Dolby Pro Logic, which requires a Dolby Prologic amplifier connected to your computer. You can also select Real channels, which make NostalgicPlayer to play the surround sound directly in the back speakers. Module called "Rippless.it" uses surround with the speech sample and "7 seconds.s3m" for the lead, so it can be used for testing purposes. |
| Disable center speaker |
If you have a setup, where you don't have a center speaker but you can't disable it in your sound card driver, you can use this option. When enabled, then all sound that will be played in the center speaker will instead be routed to the front left and right speakers. |
| Emulate Amiga LED filter |
Sets on Amiga LED filter emulation which uses a Butterworth filter. Only few mod trackers support this feature. |
Mixer output
| Output agent |
You select the agent you wish to use for outputting the sound. If the agent (e.g. the disk saver agent) has any settings, you can click on the settings button to the right to see and change them. |
Channels
Most [read: all] modules uses more than one channel, and sometimes you would want to disable certain channels (e.g. the annoying hihat in channel xx). You have the choice between finding the given channel by trying every button one after one, or you can use the buttons to the left which change the state of all the given channels. Try it out!
Agents
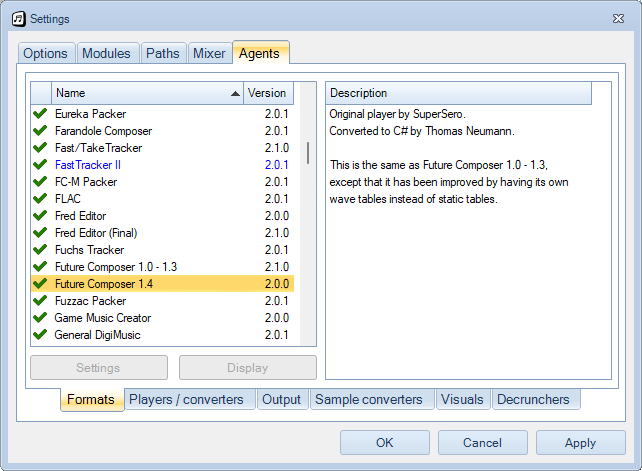
All players, visuals, sound output etc. are considered as agents, hence this common description of their setting-windows. To the left you can see a list of the available agents with their name and version.
If agent name is in blue color, it means that it is in use and is used when playing modules, so it is easy to see which player and output agent is used to play that module.
Like in the other windows, columns can be sorted and moved around as you like. To the right the description of the currently selected agent is shown.
To disable (prevent it from being loaded) you can double-click any agent.
Some agents have special settings and to set those, you select the agent and press Settings.
Some agents have something to display while the music is being played and it can showed by using the Display button.
To see a description over all available agents, click here.
|
|